IMPORTANT!
This journal is suited to a screen with a minimum width of 1024px.
You also need a somewhat up to date browser to view it properly.
Short note before you go ahead
This Journal's advanced features might not be properly displayed in Operating Systems other than Windows (at least they aren't in Xubuntu)Hello there

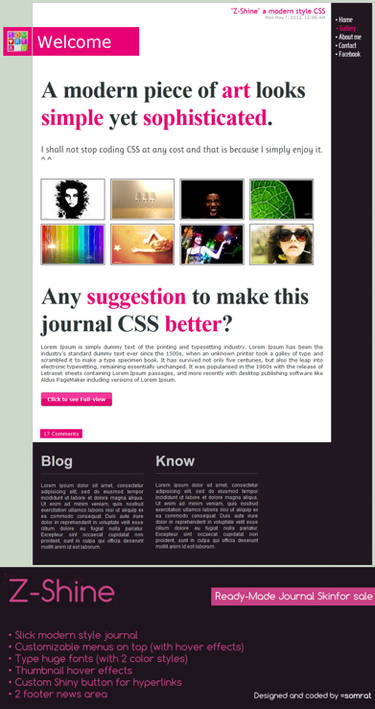
Welcome to one of the most advanced journal skins you've ever seen, if it's not
the most advanced one

Anyway, let's take a look at how you're supposed to use those features this skin offers.
Introduction
Intro
Hover a tab to see how this tutorial is organized. You'll land here again if you move your mouse away from this window.
I recommend you to view this journal on the
journal page as there is more space for the journal to be displayed.
For place saving purposes most stuff will be placed in boxes like this.
Because for some weird reason the creator likes it when unliving things are written like they talk to one I'll continue to refer to things in first person.
Structure
Basically the following text will look about like this
<div class="justbox">Insert your text here</div>
I'm a text placed within a simple box
Simple, isn't it?
Above is the code snippet and below is the outcome. All you have to do is copy that snippet and replace the small, obvious text with yours and you're done!
Take a look first
Means try out the functions first (what you most certainly already did)
Many things are hidden until hovered with the mouse, like this box.
If you haven't already, hover the white circles which are all over the place and those blue things on the right.
Now let's get to the actual tutorial

Useless Facts
I'm purely coded, means I don't use any images to be displayed.
I will only be updated as long as my creator has the possibility to use skins himself, as he doesn't like to create things which he can't actually use himself.
Default Formattings
Aside from the default formatting commands (like
this or
this) I offer some more features for you to keep your journal clean and appealing, but let's start with the re-styled default ones first.
Definition
<a> = Link
<sup> = Small Text (actually Superscript)
<sub> = Even Samller Text (actually Subscript)
<em> = Important Text (actually italic)
<h1> = Headline
<blockquote> = Quotes (and other stuff)
Unmentioned formattings work as they did before
<sup>
<sup>your text here</sup>
I'm small<sub>
<sub>your text here</sub>
I'm even smaller<em>
<em>your text here</em>
I need attention!!!<h1>
<h1>your text here</h1>
I'm a headline
<blockquote>
<blockquote>your text here</blockquote>
I look like that box showing codes
Basic Features
I'm pretty sure you've noticed that box on the right with the warning sign. You already know how to make the red text, and if you've read the introduction you even know how to places boxes already, but for completeness sake here it's again.
<div class="justbox">Insert your text here</div>
I'm a text placed within a simple box
As you can see, just a simple box. But don't overdo it with it's content or it will grow to an oversized human eating creature!

To avoid that, there are also so called scrollboxes, which you eventually have already heard of somewhere else as many journal skins offer these.
<div class="scrollbox">your text here</div>
Did you notice that the scrollbox hasn't round corners on the right? That's because normally scrollbars are squared as well
")
Now back to the warning box on the top right of this journal.
You already know how to write that red text, and you know how to create boxes, but what the hell does it do there floating on the right?
Well, I don't know that either, but I can tell you how to make them float on a site

It's really simple, actually.
<div class="justbox right">your text here</div>
I'm a box floating on the right
See? All you have to do is add either left or right to the class.
You can also align images that way.
<img class="right" src="direct image link here" />

I didn't find anything more random yet somewhat of fitting

And images can have a round corner! Nice if you want to use it in a card
 (Smile)")
<img class="round" src="direct image link here" />

- - - - >
By the way
If you want to use <sup> or <sub>
in multiple lines without it
being so spread out, try this:<sup><div align="left">your text here</div><sup>
And here
you are!
No more useless space
between the lines!
However, Opera doesn't display that properly
That should be all for now. Shall we go ahead und take a look at the advanced ones then?

Advanced Features
Right away: those are a little complicated to include to your journal, but it's as easy as for me possible
Let's start with those tabbed boxes as they can save
very much space.
1. Step
First of all you need to reserve some free space for the box. If you don't do so it will overlap text below and the boxes won't be aligned correctly.
<div class="tabbox">
Don't close that tag yet, but don't forget it at the end either or your journal will be a total mess!
-> step 2.
2. Step
After you reserved space you have to add a tab.
<div class="tab">your title here
Again, it's not yet time to close this. We still have to fill it with actual content (so the text that will be displayed when someone hovers that tab)
By the way, the first tab is shown at default (when you're currently not hovering a window)
You may proceed to step 3.
3. Step
You should have 2 open tags by now. To add the actual text for the box, type the following:
<div class="content">your text here
Now don't forget to close all divs!
Your code should look smililar to this:
<div class="tabbox"><div class="tab">tab title here<div class="content">your actual text here</div></div></div>
Take a look at the next tab for something to keep in mind!
Important
Did you see the rather cluttered code just now? Unfortunately it must be that way, otherwise the box can't be used properly

So you have to keep
all divs in a single line.
However, you may use line breaks in the content area.
To make it easier to read, that's basically how it has to be
<div tabbox><div tab>
title<div content>
content
content
content</div></div></div>
But don't forget to use the actual form, so <div class="xyz">
More Tabs
That way you'll get just one tab. To add more you'll have to close div 2 times after the content and insert another tab.
...<div class="content">
content
content
even more content
</div></div><div class="tab>2nd tab title><div class="content">
content for
the new
tab
</div></div> continue with as much tabs as you want
Also Important
Don't use too many tabs. Actually 3 with a short title are already enough. Take a look if your tabs fit within a screen with a resolution of 1280px width. If it does the majority should see all your tabs (but that still aren't 100%)
Well then, take a look at the circles on the left and the cards on the right to learn how to implement them.
The Creator's Profile
We were planned for some quick links
However, we can server as mini notes as well
But don't write too long notices, or else it won't fit into this
This large links / notes won't be available, it's just for the how to
Anyway, here's how to make these

1. Step
To begin we need to initialize this panel first (just like the cards on the right)
<div class="circlepanel">
Hit return afterwards! (to make a line break)
Don't close that tag yet, but don't forget it at the end either or your journal will be a total mess!
Go ahead to step 2.
2. Step
Now that we have the panel we can add some circles. And best of all, that's actually pretty easy!

<a> or <b>
So what is the difference? Simple.
Use
<a> if you want to place a link,
<b> for a note.
Besides, you still can make the text bold by using <strike>
Actually you could leave it that way, at least the link, but I'm sure the viewer would appreciate to know where he'll be linked to or what those empty circles are for (as there's no title for <b> yet)
Next: step 3.
3. Step
You should have 2 open tags right now, so let's make the last one!
<div class="title">your text here
Now you may close all divs.
Your code should look like this:
<div class="circlepanel">
<b><div class="title">your short title here</div></div></div>
The next tab tells you what to keep in mind!
Important
You have to make a line break after <div class="circlepanel"> and each title.
<div class="circlepanel">
<a href="your link here"><div class="title">your title here</div></a>
<b><div class="title">your title here</div></b>
<b><div class="title">your title here</div></b>
</div>
For some reason the creator finds these incredibly convenient. Do you think so, too?
You can even put images and boxes in here, even the tabbed ones!

But for now it should be enough to know how to create this card itself, shouldn't it?
Hover the next card for further instructions
Like the circle panel you have to create the panel itself first.
<div class="cardpanel">
Don't close this tag now, we have way to go!
You'll next have to add the title of the card.
<div class="title">
As you can see you shouldn't write anything there so just keep going until we have the card itself.
<div class="card">your text here
And like all other advanced features you can create more by closing div 2 times and write a new title and card.
Next card for example and things to keep in mind.
<div class="cardpanel"><div class="title"><div class="card">content
content
content</div></div>
<div class="title"><div class="card">another content
another content
another content</div></div>
Yeah, yeah, line breaks are important, but at least not that much here as for the other features.
Tabbed Box
<div class="tabbox"><div class="tab">tab title here<div class="content">your actual text here</div></div><div class="tab">tab title here<div class="content">your actual text here</div></div></div>
No line break at all except for your content
Cards
<div class="cardpanel">
<div class="title"><div class="card">content
content
content</div></div>
<div class="title"><div class="card">another content
another content
another content</div></div>
You may use line breaks before
title, but it's not necessary. However, 1 break is recommended.
Circles
<div class="circlepanel">
<a href="your link here"><div class="title">your title here</div></a>
<b><div class="title">your title here</div></b>
<b><div class="title">your title here</div></b></div>
Line breaks after
circlepanel and every
a /
b but the last one!
I hope you could understand it at least a
little bit 
There's a summery at the last card on the right.